|
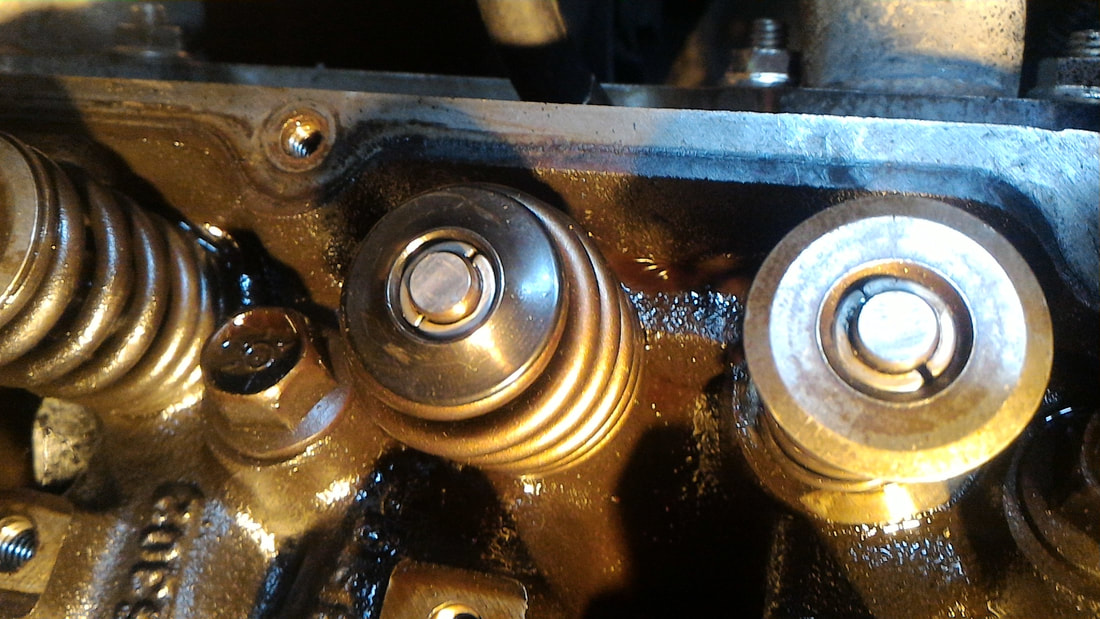
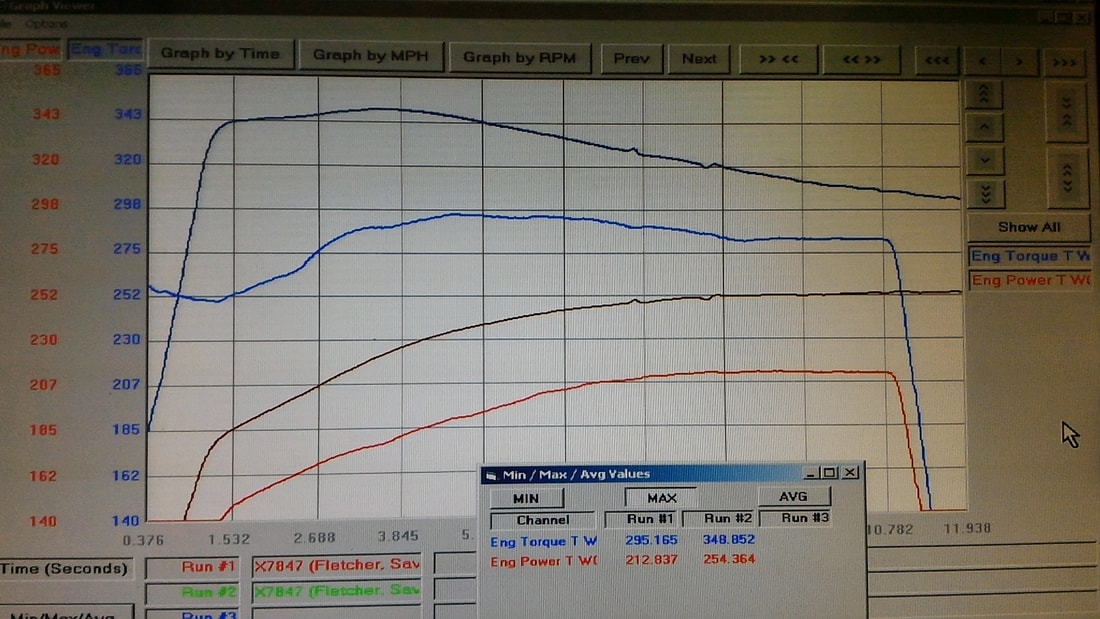
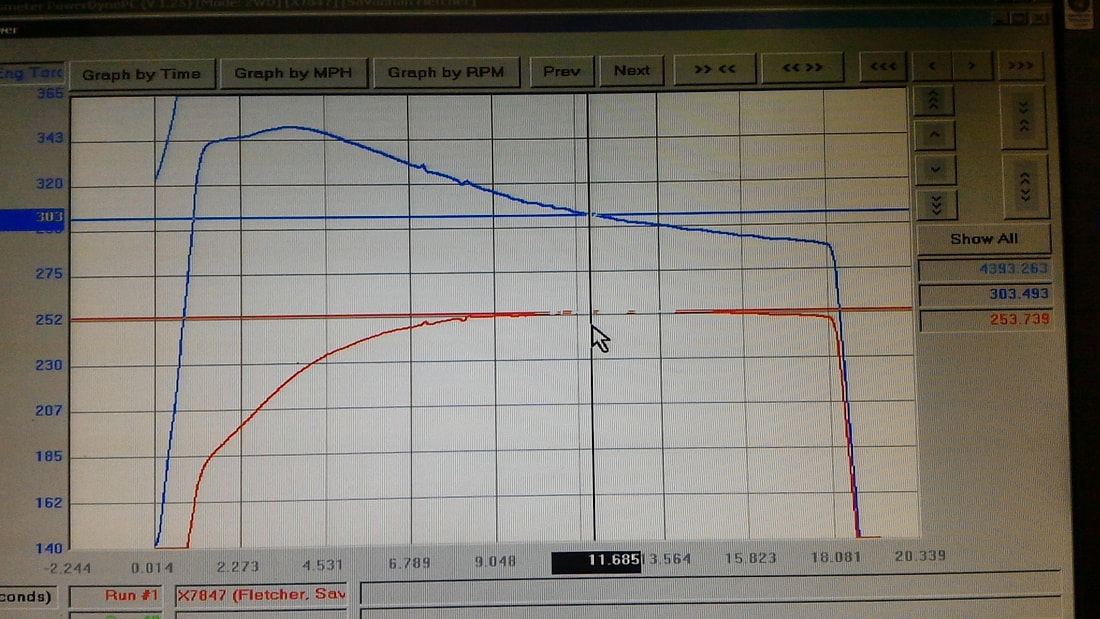
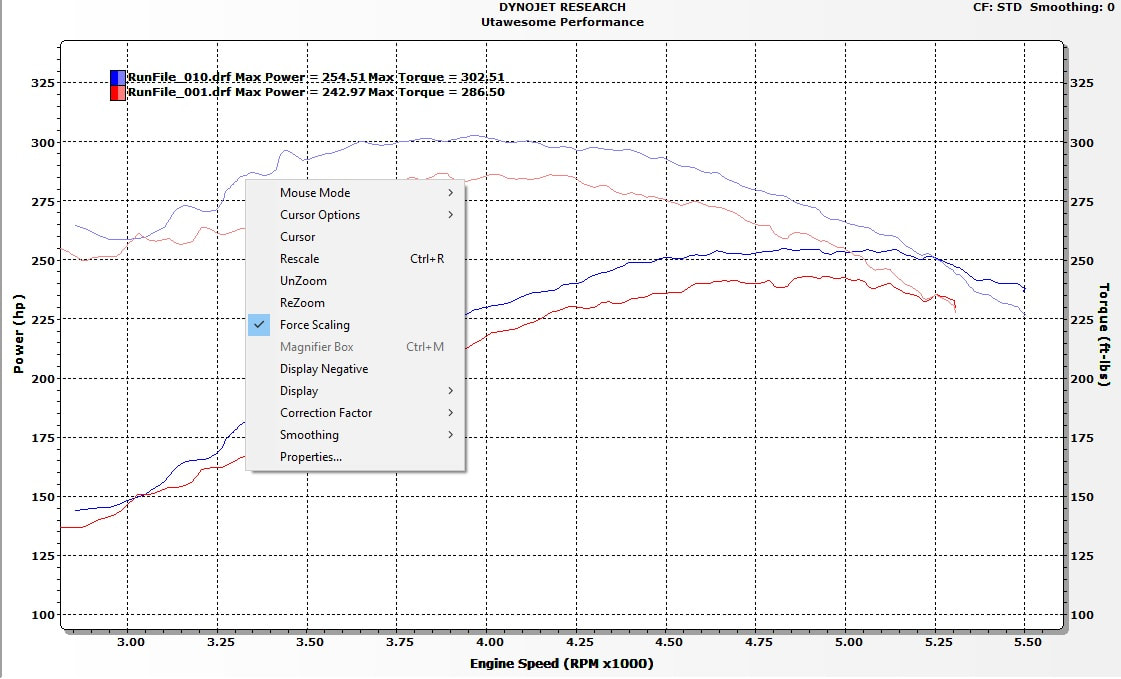
How many times have you wanted a better power producing thumper of a cam, only to discover that you need more than just the camshaft itself? You need new valvesprings, new retainers, new chain, new lifters, new rockers, on and on...pretty soon the $400 cam bill approaches $1500! Some simply care only for a choppy idle for cruisin the car shows. Some want max torque for rock crawlin' mudders. Not everyone is out to build a 6500 rpm stroker. If that is you, read on. The 360 is factory rated at the crank with 345 tq, plenty to move a 4500lb truck around on 87 octane. But what if you could have 450 tq on that same low compression engine with only 3 items? That is what the UTP 450 camshaft was designed for. The cam had three requirements: first, it must work with stock valve springs and retainers, second, it must still have enough vacuum to run the brakes and three, it must make well over 400tq with the factory 9 to 1 compression. I chose my specific lobes on this cam to pull 10-11" vacuum, keep cylinder pressures at 120-130psi and only need a SCT Tuner to make it run. But since so many heads have been replaced, thinner head gaskets are out there and decks may have been cut on blocks during a rebuild, you need to change out or ensure there is no play in the timing chain. Clearances are based upon a factory stock engine, meaning 360 pistons deep in the block, 0.043 crush head gaskets and stock 1.6 stamped rockers. We baseline dynoed the 360 and once my break-in is complete, we are going right back on the Mustang dyno to flog her. This cam is not for the 318 with its less cubic inches and flattop pistons. It would be lucky if it pulled 7 to 8" of vacuum! There is a cam I am testing for that cubic inch stocker later. As for spec's of the camshaft, we are not going to give it out. Just know it is slightly bigger than stock. You may find out from your buddy who is running it, but we are not going to give it out. Too many copied our famous 210x cam in the past years without spending the time and dyno money testing and designing that lobe. But even the 210 cam needed aftermarket valve springs. This camshaft does not. But we do have a better valvespring option for it that will free up 500-600 rpm. It is a PAC Racing Beehive and 10 gram retainer. It is a perfect match for this profile camshaft. So the three things needed are, the camshaft, new timing chain and the SCT Tuner with our custom calibration. Our before dyno was 211hp and 295tq at the tires on the big ole Ram at 5000feet and turning 37" mudders. After the camshaft only install, stock valve springs, peak tq was still at 3300rpm and 254hp and 348tq. We gained a solid 40hp and 50 tq at the tires from only a cam swap. At 4500rpm, the cam was leveling out on the stock springs and the stock intake manifold, right where we needed it to fall off. Engine was a 95k miles 360ci with shorty headers, single exhaust, K&N and SCT tuner. The only thing added was the UTP 450 cam.
7 Comments
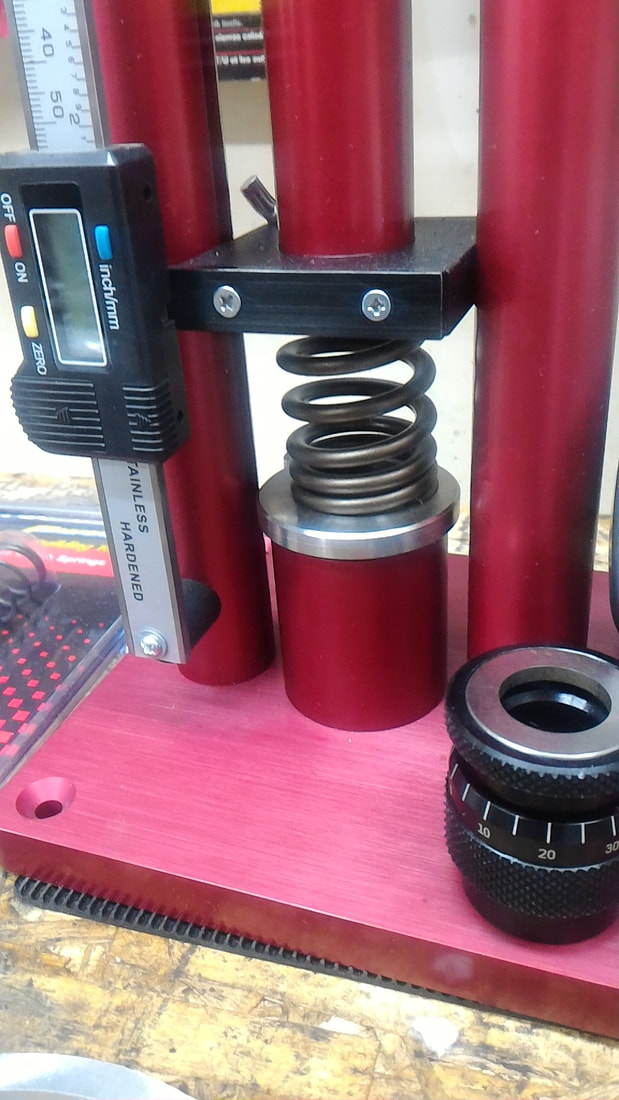
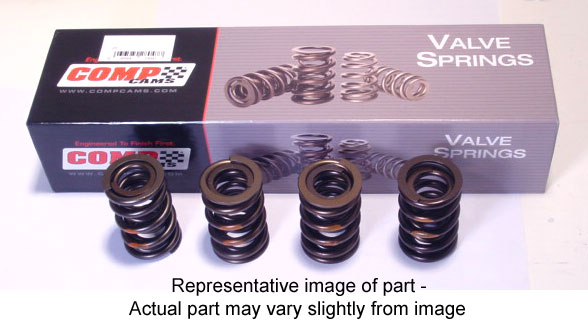
 Valve springs concerning a Magnum are very limited. Currently the best drop in available is the Mopar Performance p4976062 spring and p4452032 retainer (2.2 Chrysler retainer lol). Magnums are limited due to the shorter 4.91" length valve. That ends up with installed heights around 1.650" to 1.640". Subtract 0.600 lift from that and you are already at 1.040" The valve stem seal and seat to retainer clearance is usually 0.465 to 0.470 max. So cutting down the seat and stem guide boss are required on Magnum heads. By far the most used spring combo is the Mopar Performance spring that was specifically designed for the smaller 1.420" valve spring seat machined into the heads. If you are not looking to open the heads up to 1.500" and cut the seat and guides down, then this drop in is a true bolt on for your aftermarket cams. You can simply order those from Summit or Jegs at the lowest price they both offer. Now I am designing new roller cam profiles that will work with your stock springs. Stock springs when not worn out, are lighter in mass than the heavy springs offered by Mopar. Do not get me wrong, I am not saying they are better. I am saying, if your cam profile is small enough to work with that spring, then there is no need to shift past 5000 rpm. Number one as you can see, it is only 220lbs at 0.485" lift. Number two, your long runner intake manifold is done at 4800 rpm. Now if you are running a Mopar single plane intake manifold, then you need spring pressures that are over 300 to pull 5500+. The kits from Hughes, Performance Injection Equipment and Mopar will get you those pressures. If you think for a moment that you can rev 6500 with any of those springs and make power, forget it. Those springs will not make any power past 6000 rpm, especially with the steel retainer being 27 grams. Lighten to a titanium retainer and you will gain 100-200 rpm. The only way to make true power past that is to machine the heads for double springs or a beehive spring. The later being the best choice. A standard steel beehive retainer is 10 grams, a Titanium version is 6 grams. Plus the harmonics of a Beehive ovate spring outperform any standard in minimizing oscillation. Another option is to run 0.100" longer valves, but you will need to change pushrod lengths. Rocker geometry will still be safe if you stay below that 0.100 length. If you stay with your stock springs due to wanting low end torque for your Moab or Bear Trail machine, then for a safe setup when choosing a camshaft, keep the lift around 0.450". That gives you 0.060" or more safe bind clearance as the stock spring will bind at 0.520". That is why 1.7 roller rockers work well on stock cams and springs.
 Here is some rear mount turbo info for those who asked. First, you can run a muffler behind the turbo if you choose, of not if you want the cool cruising sound. Machs Nix...makes no difference as long as you stay the same diameter of the turbo outlet. Second, intercoolers are usually not needed due to the length of outlet piping headed forward on the truck to the throttle body. Since the turbo sits lower than the engine, being oil fed, it has to return that oil back to the engine. I used to use TurboWerks, now it is all CX Racing parts. Make sure the line is at least #8 returning to the engine. Some folks tap the oil pan, some return to the valve cover, some are more detailed. Keep in mind, you can send too much oil to the turbo and modifying nitrous jets to use in the inlet of the turbo works well to keep from blowing the turbo seal out. Most turbos come with restriction inlets now anyways. I weld my piping flanges in place and simply run a pre filter on the K&N filters to the inlet. If it is an off road project, I work hard to mount the turbo upfront, not in the rear. Depending upon boost levels and whether the engine is stock, determines the boost level. Most mags respond well with 6-8psi. Intercooling never hurts, as the cooler the intake temp, the more spark advance you can run. Timing with no intercooler needs to stay around 16-18 degrees at 11.8afr. With an intercooler you can run 20-22 with 11.8 afr target. Egt should be safe at 1200 or much less. You will need a 2 bar MAP sensor, 60lb injectors, and a SCT with a 2bar calibration in it. Keep the wastegate close to the turbo, keep the blowoff valve on the exit side of the intercooler or close to the throttle body airhat. 60mm will come on around 2800, a big 76 will come on much later. I always, run Cometic head gaskets with ARP head studs, and seal the plenum of the intake. Better valvesprings should be considered as it will try to lift them under boost. Here are a few shots... 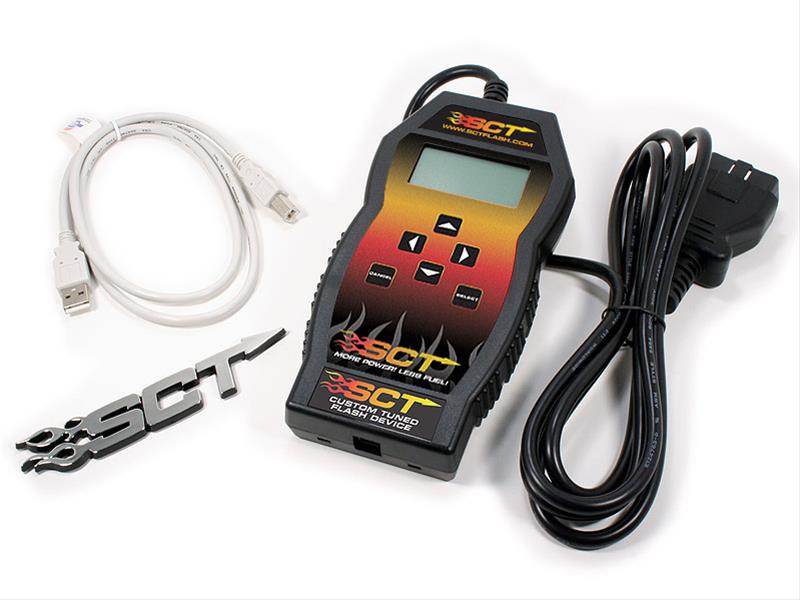 So what is this sorcery you speak of??? What does it do? Will this magic box steal my soul...... Well, no. It allows you to rewrite your factory calibration in your engine controller for more horsepower and torque. Either you can purchase the software and write to it on your own or your preferred tuner will write the calibration for you and email it. SCT opened up a whole new world for the performance industry by allowing end users to modify the factory calibrations on all platforms. Before that, we had Hypertech and Superchips plus Mopar Performance PCM's. But when stroking the engine, adding cams, heads or power adders such as boost, there were few solutions beyond increasing fuel pressure to account for boost. Now you can run a 2 bar map sensor with 60lb injectors if you are supercharged or turbo'd. So here are some guidelines to remember when purchasing the SCT for your 96-2003 Jeep Ram Dakota:
 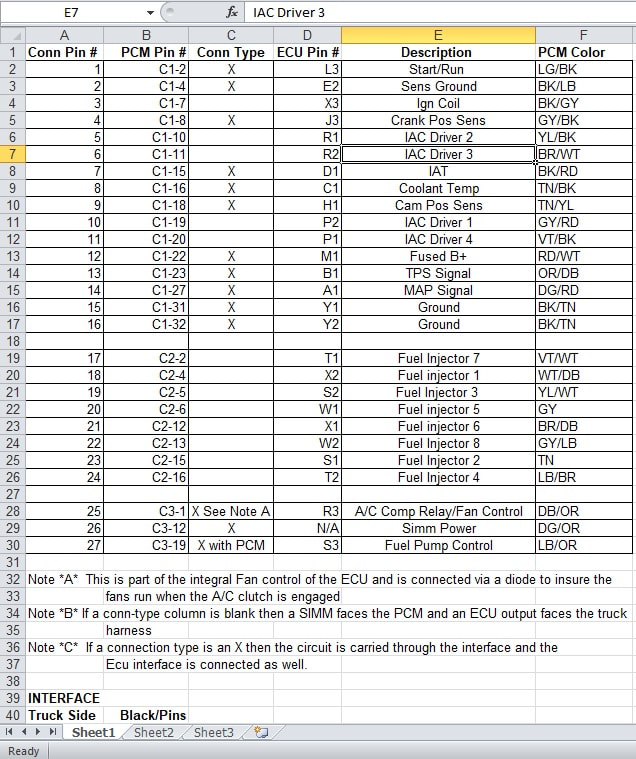 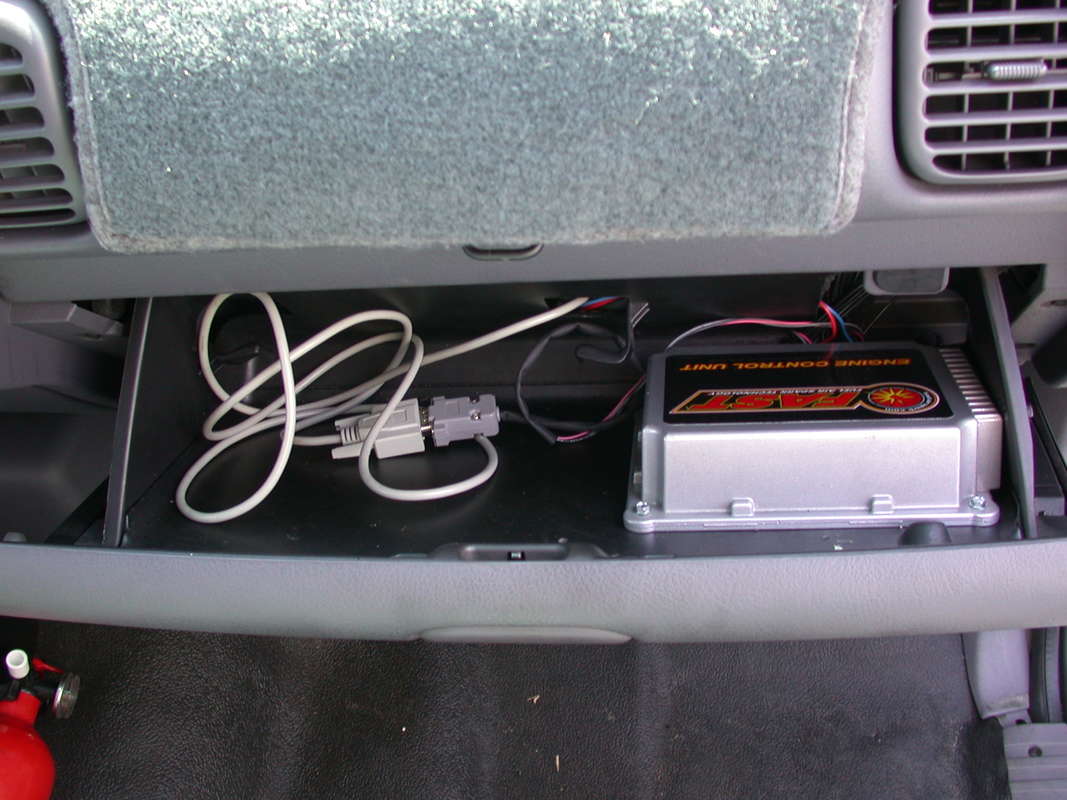 Here is my old cheat sheet for wiring in the standalone wiring to your 96 and newer PCMs. Keep in mind, you will get check engine lights for disconnected items the FAST is now controlling, unless you create a adapter that emulates each of the removed items. FAST ecu's allow radical builds that correct in realtime, no flashing process needed. Keep in mind your specific wiring colors may have changed.
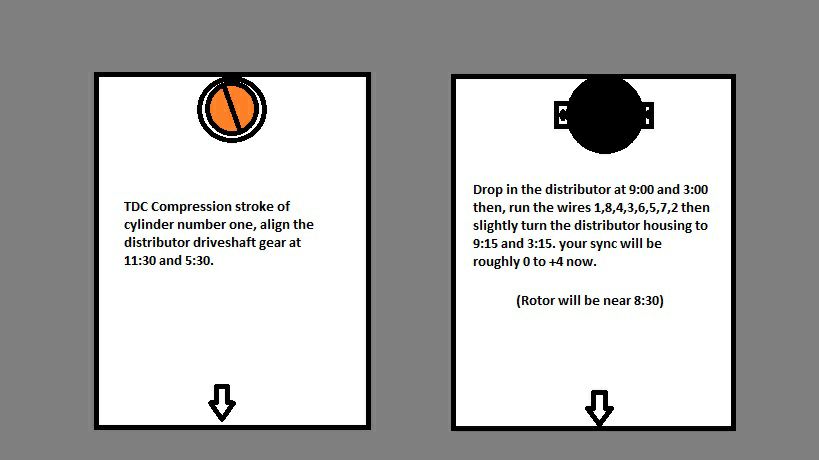  So you moved your distributor or changed cams and now the truck is running strange? What gives? Can I just throw my timing light back on my 92-2003 318 and reset it? Must be the tune right???
Not just no..... Moving the distributor does not change your spark~that's right, does not change it. What you do change is WHEN your injectors fire. The time is called cam sync- which is related to your crankshaft position sensor. You can imagine what happens if your intake valve has just closed and then your send fuel in the runner. You just missed your cylinder fill window for that cycle. Underneath the distributor is a gear driven by your camshaft called the oil pump driveshaft. That's right, it is what turns the oil pump downstairs and the distributor upstairs. When moving that oil pump driveshaft by changing cams, it has to be set back up to properly fire your injectors. Once you have mechanically set the steps above, you can put a scanner such as a Matco, SnapOn or DRB to set the sync. It will display sync OK if it is between -8 and +8. In the performance world, we always set to +4 to throw the mix right as the valve is opening with velocity. No scanner though? Simply follow the clocking directions above and you will be super close. Here is a great article below that will help you understand further details: (although I may actually be the author from the Bionic Dodge days...) Magnum Engine Distributor Removal, Replacement, Re-syncing When the distributor is removed and replaced in the magnum (fuel-injected) engines, the distributor must be synchronized to properly time the injector pulse (spray), similar to the ignition timing for the spark plugs. The distributor does not control the spark timing that is controlled by the computer. When the distributor is re-installed you need to get the sync close enough to start the engine so you can get it properly synced. If the intermediate shaft was removed, as when replacing the camshaft, it must be correctly positioned before the distributor is installed. The slot in the top of the intermediate shaft must be positioned so that the slot runs from an 11:00 o’clock to a 5:00 o’clock position when cylinder #1 is at TDC compression stroke ( if the shaft is straight front to rear that is the 12:00 o’clock to 6:00 o’clock position). Once the intermediate shaft is correctly in place, the distributor can be installed. Bring the #1 piston up to top dead center (T.D.C.) on the compression stroke. Remove the #1 plug and you can feel pressure coming out of the plug hole on the compression stroke. Line-up the T.D.C. mark on the damper, with the “0” mark on the timing tab, on the timing chain cover. Install the distributor so that the rotor is lined with the small notch in the plate that covers the top of the distributor base. This mark will time the injectors to pulse close enough to get the engine started and run. Proper final synching should be done with a dealer’s scan tool DRBIII or Snap-On Scanner. The information given here is based on those scanners. Other scanners may not read exactly like the Snap-On. Setting the sync using an ohm meter is not recommended or accurate. Using a scanner, the idle is brought up to 1000 rpm, to reduce valve train fluctuations and the sync signal set to zero. Most of our cams can use 3-5 units advance/positive. Note: This advance setting is only applicable when using the Snap-On DRBIII Scanners. The units are not all the same on other scanners. If you do not have a scanner that can do this, then pay to have the dealership do this. Some of the symptoms that the sync signal is incorrect, you will get back firing through the intake manifold; vehicle will not idle or you will get major detonation at light loads causing the vehicle to lose severe power over 3000 rpm.   Everyone want's their Dodge to rule the world.. In a now 600 foot lb and greater arena with Diesel Dodges, a cam'd V-8 in a Hotchkis Slammed Dak, Jacked up Ram on 38's, or even some Janky Jeep on Moab's escalator (yes Joel Robinson, I just honored you my friend)~ a lumpy cam still commands respect that a man has busted his knuckles to made his ride better than the next. So, before delving into camshafts, and you guys know I will -as I have literally spent hundreds of thousands of dollars on grinds that work and did not work-let's discuss the valve springs on your stock magnum heads. Most stock 318/360 cams from the factory have the specs of the following:
Actual Lift: .411/.430 (Intake/Exhaust) Duration: 264/250 adv and at 0.050 lift-182/194 Stock 1.6 rockers. So you can see that a simple mod with stock characteristics, was to add 1.7 ratio roller rockers, freeing friction and adding lift and slight duration to the stock profile. But that was the limit of the stock valve spring as it was near coil bind. It was then Mopar Performance released the Mopar P4876062 for .600 lift ability and the smaller P5249464 for .525 lifts. Both used the P4452032- 8 mm retainer and P4529218 keepers for the 5/15 8mm valve stems. The seats on the heads and length of valves was short compared to Ford and Chevy standards. Most installed heights are 1.640" and the base of the spring was 1.42" to drop in your factory seat. Seat pressures with the aftermarket springs were standard roller performance of 130# and 300+ at 0.500 lift (most performance cams mild stayed .480 to .512 lift). In my years of running literally thousands of those springs, I only had 3 break. So choosing a better spring with a different manufacturer of your choice, such as Comp, Pac, Manley etc, means you have to find a spring with good pressures and higher coil bind specs on that 1.64" installed height. Not that easy as most are 1.7 or 1.8 installed heights. One way is to run a hundred thou longer valve from your stock length of 4.91 intake and 4.93 exhaust. Another way is to cut the seat lower on the heads, also making sure to adjust the valve stem seal base lower too. Offset retainer keepers are also available in 0.050. That opens up a world of spring choices for you. The tip length on a stock Mopar valve is .125 also. Double springs require head seat machining without any questions. As do the excellent performing Beehive design springs. Most mild cam profiles are going to have a lobe lift of .300 to .320. That with your stock rocker arm ratio of 1.6 is 0.480" lift and 0.512" lift (1.6 x 0.312). Most will agree that having a safe 0.060" gap before coil bind is desired. Because as you can imagine, a valve kissing the piston is terrible on a wallet. So before you start considering that rumpity camshaft on Ebay, upgrade your valve springs first. You will actually get better performance from added compression at the valve seat and follow the cam lobe much more stabilized. 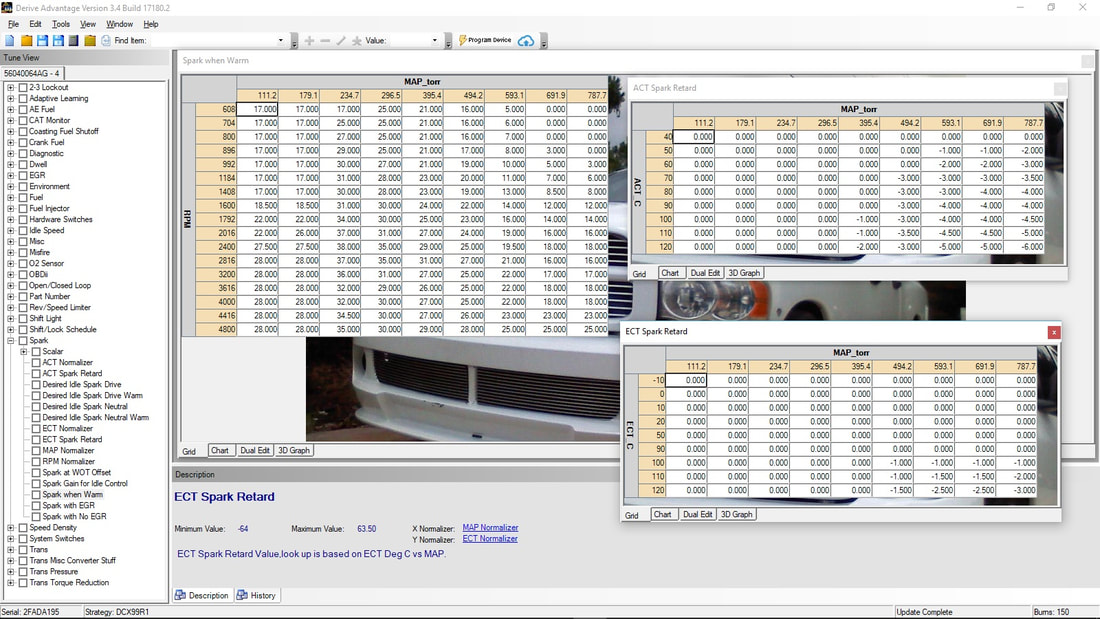 Stock Dodge V8 spark curve and IAT CTS retards. 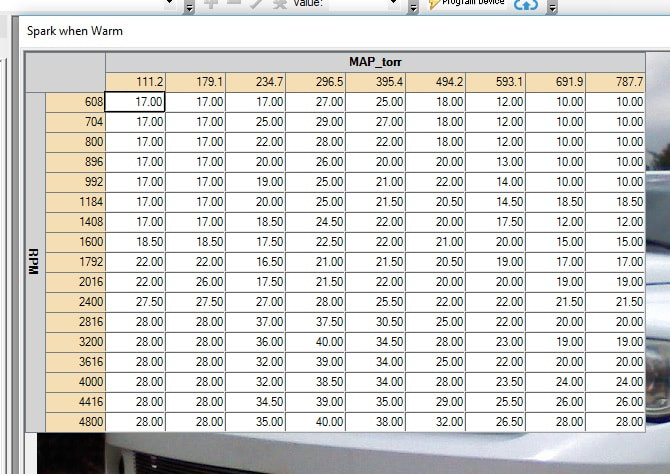 Mopar Performance Spark Curve  Superchips 93 Octane Spark Curve Superchips 93 Octane Spark Curve You can see that long gone are the days of having your spark distributor setup on the old Sun Machine. You would otherwise order a weight and spring kit for your distributor to dial in your spark curve. The weights were centrifugal and either made your timing come in faster or late. The amount could be limited also. (Ironic, I am speaking as if we do not do this anymore, yet we do.) With the advent of engine controllers, as you can see from Dodge Ram spark curve above, it is all done on a programmed grid. The Sun Machine and weight kit is now a laptop. Now different software will report your engine load (vacuum or lack of) in different ways. Why we can't just say inches of vac and zero vacuum is the same argument why us 'Muricans use standard wrenches compared to metric-pointless. Before OBD2 was released in 1996, all 1992-1995s were accessed by the OTC tool DRB-2. After that the DRB-3 was the tool. But when the fuel industry began diluting our fuel quality, many Chrysler vehicles with stock parts such as 195 and 205 thermostats, experienced spark knock. So when the customers brought in the vehicles to the dealer, one of the updates to cure spark knock, was to access the spark adjustment screen on the DRB-2 and pull timing out in 2 degrees increments. This was a global change on the spark table, not just a specific area. One of my good friends who was deep years ago in the Viper development program told me about a glitch in the DRB-2 that allowed us to actually advance that timing. Simply access the Spark Adjust screen, toggle the up and down buttons fast, and the global will jump and add 20 degrees increasing the idle instantly, and then you backed it down to a positive number such as +6. That little trick allowed us to pick up 20-30tq on a OBD1 controlled truck with no other mods. Worked really great on the 4 cylinder Wranglers with factory 4.10 gears which I raced in Albuquerque at 9 mile hill decades ago. So when the 1996 OBD2 trucks came out, the DRB-3 would reflash to a completely different timing table with changes in certain areas. I verified this with a simple scanner log of before and after in '96. Further verification was the main internet forum then everyone Dodge Truck related used, called The Dakota Mailing List by a great friend, Jon Steiger. Everyone was complaining their trucks was now sluggish and 2-3 tenths slower at the track. Well, when you go from 24 degrees timing to 16-18 at WOT, that is the result. So as I typed my scanner log findings to the group, I was watching Star Wars and at that moment, Luke had just destroyed the Death Star-hmm... So I coined it the Death Flash...true story, check the old Fredu University archives...
Back on topic (stay on target Luke), wide open throttle (wot) is listed on SCT's view above as 787 torr, and 30 inches of high vacuum (decel), is 110 Torr. RPM is listed on the left side idle to 4800. Anything past 4800 in those cells, is simply used from there on. In the case above, 787 Torr WOT at 4800 commands 25 degrees spark. So 5500rpm will be the same. We now can rescale that to any rpm and adjust that specific area. Now when the trucks start to increase coolant temps, you can see timing is pulled out from your CTS sensor, especially when truly overheated to protect piston and head gasket failure. The same is said for you Air Inlet Temps via the IAT sensor in your hot aluminum manifold. In the old days, we would freeze the sensor before a pass at the track to get our max commanded timing, then relocated it to a cooler position than the 180-200 degree Beer Keg Intake Manifold. So as you can see with the completely stock Dodge table above even though we are commanding 25 degrees at WOT, with a bad coolant or IAT sensor, you could see an actual total timing of 16 degrees timing. That is why the very first mod was to relocate the IAT to a cooler area and add a 180 thermostat from the 195. When Mopar Performance released the Performance PCMs, they were an excellent improvement to leaning out an already fat fuel curve and weak spark advance curve. You can easily see the spark change in the second graph above from Mopar Performance. On 97 and later Mopar also turned off the torque management for even better tire frying launches. So when your HP Tuners, SCT or Diablo custom tuner is writing a custom tune for you involving spark, he or she is modifying that table and flashing the vehicle with it. Based upon your combo and octane, he is writing that table specific to your combo. Companies like Superchips, used the chassis dyno to come up with the best combo back then which actually bested the Mopar Calibration. You can see the 93 octane Superchips curve to the left. All together, they defeated the Death Flash~ although not with a joyous celebration on the Moon of Endor, we all rejoiced at tracks and dirt trails worldwide. Happy Thanksgiving from the Rusty Ram Mafia. |